Murphy left the area long enough to get color on this firebird... for the third or fourth attempt now. Huzzah!
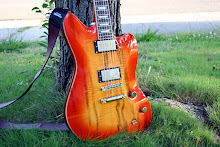
 5/28: almost done with clear, had to roll it outside with the good camera for a real picture.

 5/28: almost done with clear, had to roll it outside with the good camera for a real picture.


 First we glued up some blanks and caps. Im using something new (to us), Wormwood Maple. Its really neat stuff, some spalting, some figuring its really nice stuff.
 I decided to build two of them this time, one full solid and one semi-hollow. They are from the exact same pieces of Mahogany and Maple so it will be interesting to compare them tone wise. I won't lie, my back will prefer the semi-hollow!
 Gluing the caps on. Can never have enough clamps... though I really need to get my vaccum bag setup running again.
 This is coming back to my problem on the CNC. The solution came from a friend and really was a simple solution. Build a simple ramped spoiler board that creates the angle I need to mill the neck angle, pickup pockets and neck pocket. Now I *can* mill the angle right off the face of the guitar but the problem is the pickup pockets will "lean back". This solves that issue.
 "ramped" on the CNC, working like a charm.
 Off the CNC you can see the angles and pockets cut. I couldn't be more pleased and it keeps right in line with the Keep It Simple Stupid solution. From here it goes back on, flat like normal to cut the carve, shape of the body and bridge placements.
 Now I said I did two... this if the first one. 90% of this went off with out a hitch but I got a bit overzealous and ran this with out doing mockups. Well I goofed up the carve program and it ran right through pickup routings. D'OH! No biggie, I'll plane the top off run it again with the fixed programs.
 After fixing the carve programs I ran the second body and it ran with out a hitch. Its tough to see but this is how the carve comes out straight out of the cnc. From here I just blend it out with 120 grit on a palm sander.
 There we go, basically sanded and ready for the next steps (making the necks).
 and a shot of the back. Really nice tight grained African Mahogany here. Well till next time folks... :D
 Everything started here. You could see in my last post that Dave, Steve and I prepped a bunch of material. Dave and I spent most of the following week sending bodies through the wide belt to get them completely prepped.
 Around 9:30 people started straggling in and sorting through blanks. I made some guides that showed the tooling path of the CNC.
 Here is where I spent ALL day... standing in front of the CNC.
 Strat style body about half way run. While this was going on the BBQ was fired up and food started to be cooked.
 She even made a new friend!
 People scarfing down on some food
 Guitars were EVERYWHERE! (keen eyes will notice the strat on the right is the "CourtneyCaster"
 While everyone was enjoying some food Dad was flush trimming and edge routing bodies.
 Cleaning up the neck pocket.
 Running the round over
 Then it was off to the dreaded part. Everyone was responsible for sanding their own bodies.
 sanding.... so much sanding!
 Mike from www.phatdaddyguitarworks.com came down with a Greer Amplification Thunderbolt 30. UNBELIEVABLE amp, already have one on order!
 The black and wheat amp in the back corner is my new Greer Oktal Grinder. Another fantastic amp from Nick Greer!
 Soon the guys from Brownnote showed up with 3-4 fantastic amps in tow and soon the "amp room" was so crowded you could barely stand in there!!
 My Firebird got A LOT of play time during the day!
 Dad and Charlie the Shop Dog
 More people hanging out by the CNC watching their bodies run.
 More Dad working hard. I have to say, Dad, Steve, Dave and even my wife and my mom worked their ARSES off during the day. We couldn't have done it with out their help.
 "Good night Sacramento, we love you!"