Sunday, October 4, 2009

Daylight...twilight?

Been burning the midnight oil. In our last update I had just finished spraying the first batch of Daylighter's. Well enough time has passed that it was time to start wet sanding, wiring and setting them up. We are still waiting on a few parts to show so *HOPEFULLY* by mid week we'll have the first couple guitars up and playing.

Now some of you may have noticed that I do the final stages on a guitar at my own house. There are a couple reasons for this but mostly its to get away from the noise and dust of the shop.

Dad hard at work wet sanding...
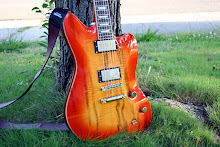
and this was the result after buffing! GORGEOUS!
A little washed out by the sun but the bursted, matching headstock
and the back
Another Daylighter wet sanded and polished. This guy gets a TonePro's wrap around tailpiece

Now while Dad was hard at work wet sanding, I made some templates for cutting shielding tape. Trying a little different approach here and by the third guitar we had the process just about perfected. Im a little iffy on the shielding tape. I honestly believe its much more effective than the shielding paint but I won't lie, the shielding paint looks a LOT nicer. We'll see..
Template for cutting the shielding for the "floor" of the cavity. This jig serves double duty that I'll touch on later
First I shield the walls. The guitars after this actually have the tape overlapping the floor.
Then apply the "floor". We went back and made a small strip that joined it all together on this guitar.

After I cut a few guitars worth the shielding I started on prewiring a few harnesses. You can see my template back in use here.

And the finished product.

Lastly some teaser shots of 4449-1 just about ready to go. Just needs tuners and the nut slotted!
Reflection shot of the bench guardian!


With a little luck the next update will be only a couple days out with a tone report on 4449-1! Over all I couldn't be more pleased, there are a few production tweaks I want to make for the future guitars but its all very minor stuff. For as quickly as the Daylighters have come together I am positively over joyed!

-d

Sunday, September 20, 2009

Joes Thunderbird... the finale

Joe's Thunderbird is done!! Shipped out last week, hope he enjoys it!


Big Boy!!

BIG BOY update!! Skipping a lot here again but lots of the same process can be seen in the "daylighter" updates.

We mixed up some cherry tinted lacquer and shot the entire guitar with it (save for the maple faux binding). Since this is Billy-Bo inspired and those are solid red it felt right. Carbon Fiber rear covers here too.
The blackberry camera does NOT do this justice, it looks like the Cool-Aid guy is about to jump out of the top. Way cool

Just about finished. One more day of clear and this guy is done!

(day)light at the end of the tunnel!

Hang on this is a MASSIVE update... two or more weeks worth. So where'd we leave off, binding the necks I believe! Here we go!!


I've skipped ahead here a bit. Last update was gluing fretboards on, here's -5 with the neck roughly in place. We inlayed, fretted and shaped the necks of 4449 1-5 at the same time.
-5 mocked up
While we all got the joy of leveling and fretting I was the only one with the camera so here is Steve leveling out his inlays. We got smart and screwed the blocks down to the bench and worked over them. MUCH easier.

The Arbor Press we converted over to a fret press.
Shaping the neck. I'm skipping a fair amount here but its the same process we've covered before.

Once 1-5 were shaped, we final sanded we started oiling the tops with Boiled Linseed Oil. The normal MO for bringing out the figure in maple tops was to dye them direct and sand back. We decided to use BLO instead because I didn't want to color the spalting with direct dying instead we opted to spray tinted lacquers.

The caps after oiling and sealing. Since these are called "Daylighters" I was aiming for a sunburst that roughly matched the colors of the actual train.
The Yellow'ish center color.
With the red/orange bursted edge.

Now skipping ahead a bit again I bursted the rest of this batch. After getting the fronts shot I worked up a back color and started shooting them.
These guys are going to get blacked headstocks with a special treat I have worked up.


There we go! About a 1/3rd of the way through the clear coat process but things are REALLY looking great!

This is 4449-6 that we ended up adding a matching headstock to.


Sealed and ready for its burst.

Bursted!!

4449-5's bursted and back color applied.

Wenge/Maple binding that we did.


There we go, #5 is coming along great too!

I PROMISE the next update won't be so far behind!

Sunday, August 23, 2009

Daylighters and binding...

Today we made a bunch of Maple and Wenge binding strips and started binding and gluing fretboards down.
Strips of binding material

We made this jig for trimming binding to length on the end of the fretboard.
Test fitting a few strips

End pieces glued on
This jig is notched to clamp the binding into place.
All clamped up and waiting for the glue to set.
Once the glue was set we drilled the side dots, put them in, scraped them flush and started getting ready to glue fretboards down.
Before putting them into the clamping jigs we knocked the binding down to fretboard height.
Rosewood and Wenge...
Wenge and Maple
There we go. Can't WAIT to pull them out of the clamps tomorrow.